We are going to first focus on data capture. Essentially this means the following
- A javascript listener on top of a page or every page (as the case might dictate)
- All events in the page will be captured through a process called event bubbling
- Send the data through an Ajax call to a database
But before I go there a few housekeeping things in order
Website we will be used to test our clickstream http://adiganguli.com/test-shopping/
Github account for the code:
Client (Event capture in browser) and Server (Store events)
Ok lets get started
First thing we need to understand is how to insert an event listener or handler so that all events across the entire website can be handled. Answer to this is the website header which sits at the top of every page and maintains UX, logos etc
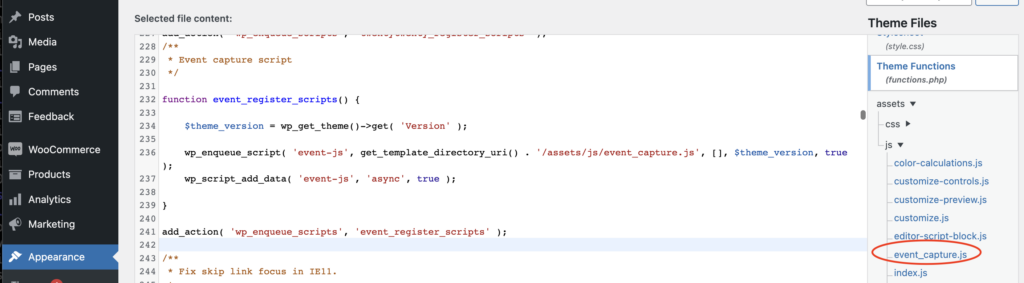
Second we need to insert the javascript file into the footer. Since we are building it first for woocommerce which is wordpress based, we will be using the wordpress method. https://developer.wordpress.org/reference/functions/wp_enqueue_script/
I have created an event_capture.js which will be placed in the assets/js folder of the wordpress theme. Now a quick testing to see if it all works before we start to develop event capture mechanism.
Result is a simple ‘Hi There’ in the console. Well my version of hello world, but good thing is it works.What happened here? I placed a javascript file which is downloaded as an asset in the browser of the customer or client who visits my website. This javascript will now capture all browser clicks (or other events) that the customer does in the way of interaction with my website. Next we change this javascript to enable it to capture and handle all events
Event capture
We want to capture all click and few other events here and following associated properties
- Properties related to the event – time, URL, element text, browser, device
Available to the javascript element, accessed through following
// create a timestamp
    var timestamp = new Date().getTime();
    // get user agent
    var userAgent = navigator.userAgent;
    // get browswer
    var browser = navigator.appName;
    // get browser version
    var browserVersion = navigator.appVersion;
    // get OS
var OS = navigator.platform;- Properties related to user session in browser – Session identifier, guest user identifier (which will be a piece of code sitting in local browser storage similar to cookie). This will help allow same user across sessions
// create a token identifier for this session and store in browser local storage
    var token = localStorage.getItem('token');
    if (!token) {
        token = Math.random().toString(36).substring(2);
        localStorage.setItem('token', token);
    }

    // create a session identifier for this session and remove it after 30 minutes
    var session = localStorage.getItem('session');
    if (!session) {
        session = Math.random().toString(36).substring(2);
        localStorage.setItem('session', session);
        setTimeout(function() {
            localStorage.removeItem('session');
        }, 30 * 60 * 1000);
}- Finally properties related to user – user identifier, email. These will need to be obtained from current_user property of wordpress. For this we will need to modify functions.php and add a single line. wp_localize_script will associate current_user to user_var which can then be accessed inside the javascript file
wp_localize_script( 'event-js', 'user_var', array('current_user' => wp_get_current_user()));Bunch of user properties can be accessed. we will limit to only user_id, email
Queing and sending the events data
In the last part of this post, we will be sending data through AJAX requests. Also we will be queueing the data to send it in intervals of 10 seconds to avoid too many function calls and potential slowing down the page
To do this again following steps need to be done
- Create a stack of events for 10 seconds
- Send data in a single Asynchronous Post request
setInterval(function() {
    var events = localStorage.getItem('events');
    if (events) {
        events = JSON.parse(events);
        localStorage.removeItem('events');
        var xhr = new XMLHttpRequest();
        xhr.open('POST', 'http://localhost:8080/events', true);
        xhr.setRequestHeader('Content-Type', 'application/json');
        xhr.send(JSON.stringify(events));
    }
}
, 10000);
This completes the first part of our project that is click and attribute capture. You might have noticed, am sending events to localhost:8080 which is a django server hosted on my local machine. The next part is to create a Django server and test out if events are actually coming in the way wen want. Also we will create a raw database to capture all events
This is Part 2 of a series of posts to create your own clickstream. Part 1 here
P.S: Deployment trivia
I had created a wordpress instance on AWS lightsail as I found it the easiest and most cost effective for my requirements.
/* Go to the connect tab on Lightsail instance and download default key which should be in *.pem format if not already done */

// Connect to the instance
$ ssh -i <key> bitnami@<ip address>

//js file resides here where twentytwenty is the theme
/stack/wordpress/wp-content/themes/twentytwenty/assets/js

//Copy any changes to your local event_capture.js to the instance //using following
$ scp -i <key> file_local_path bitname@<ip address>
For now, am not linking the instance to github from where it can fetch the event_capture.js file , however that’s the right way to do it.